


IRP User Guide: Source Image Viewer (SIV)
The Source Image Viewer (SIV) is at the heart of the BSIP IRP, and displays all the information and images for a specific source.
The SIV has 3 active panels and places extra information and controls on the IRP menu bar.
The IRP menu bar
When the SIV is active the menu bar has a centre group.
![]() The BSIP Reference is shown first.
The BSIP Reference is shown first.
![]() BSIP Reference direct navigation.
BSIP Reference direct navigation.
Clicking on the BSIP Reference causes it to change to an entry box where we can enter a BSIP Reference to go directly to another source. When the box loses focus, or the RETURN or ENTER keys are pressed the reference is processed. The navigation can be abandoned by pressing the ESC key.
![]() The collection controls.
The collection controls.
The collection controls are shown if the SIV was invoked from an Explore view (search or browse). It allows us to navigate through the results without leaving the SIV. The button on the left takes us to the first result, and the second button the previous result. In the middle is the collection position. On the left is the number of the result currently being viewed, and on the right the total number of results. The collection position is then followed by three buttons. The first takes us to the next result, the second takes us to the last result, and the last blue button will take us back to the Explore results view.
![]() The Pins & Pulses controls.
The Pins & Pulses controls.
These buttons control the pins & pulses (the Research Target visual locators) which are overlaid in the Image Viewer Panel. We shall examine their behaviour when we look at he Image Viewer Panel below.
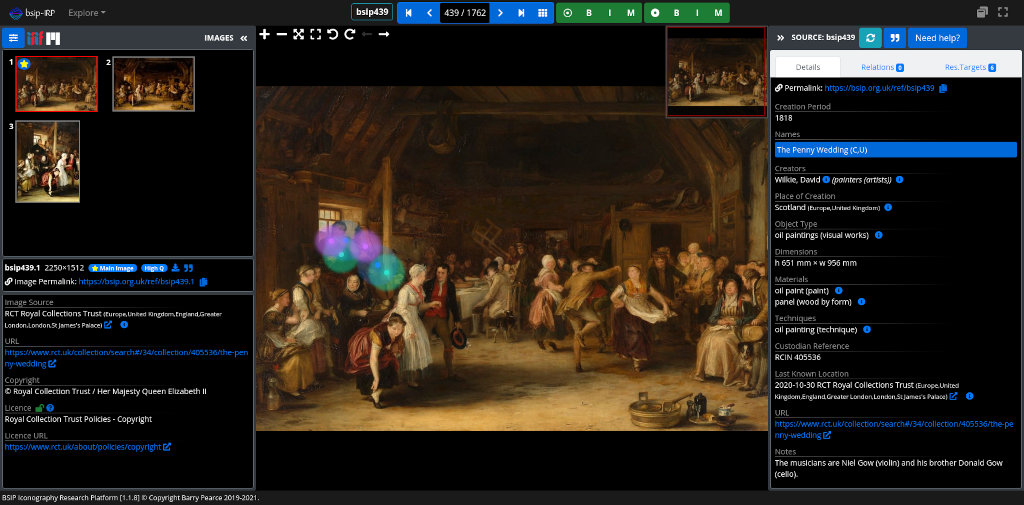
The Images panel
This panel displays information about the images for a specific source, controls which image is being viewed and includes the advanced image manipulation controls. Essentially all things to do with images other than basic viewing are handled on this panel. The Images panel may be collapsed/expanded using the double chevron buttons on the top right of the panel or the expand/collapse buttons on the top left of the panel if on mobile.
![]()
At the top of the panel are three buttons. The first is the Image Selector/Control Panel mode toggle (more on this shortly). This is followed by the IIIF logo and Mirador logo buttons. These are used to compare images side by side and to view BSIP images in external viewers. This advanced functionality has a dedicated user guide: Comparing Images with Mirador & IIIF
Below the panel buttons there are four sub-panels. The topmost of these is the multi-functional Image Selector/Image Control Panel. It has two modes, which may be toggled using the blue slider button.
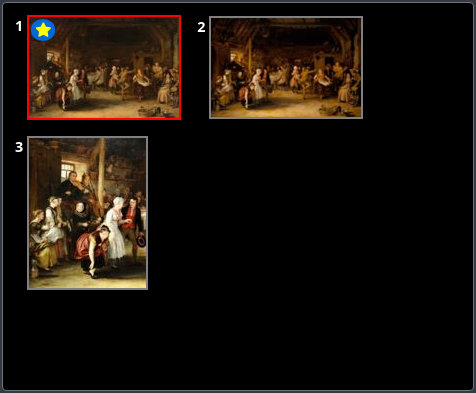
When in image selector mode it shows all the images associated with the source. The image currently being viewed has a red border. A yellow star within a blue circle indicates the main image. The main image is the primary image shown in the explore results. Each image is numbered. Clicking on an image selects it and the rest of the image panel sub-panels and the main Image Viewing Panel will reflect the new choice.
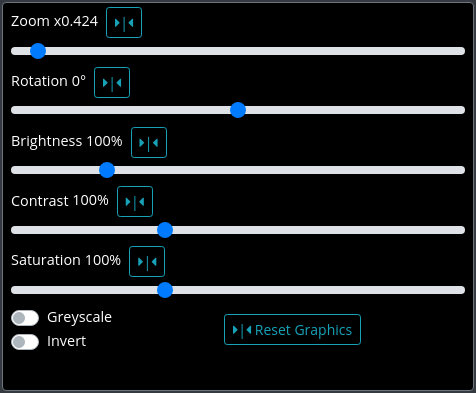
When the panel is in image control mode it shows zoom, rotation and graphics manipulation controls. All these may be used with keyboard and mouse and provide a high degree of control. (The zoom and rotation may be controlled far more accurately than the image viewer (icon controls/mouse wheel/keyboard).
For each a cyan reset button is provided. On the zoom control this resets to 1, so the image is shown at actual size. This is different from the fit to window button on the image viewer.
The brightness, contrast, saturation, greyscale and invert controls provide image manipulation that can be useful when trying to distinguish features. This group of controls are known the graphics manipulation controls and they have their own group reset button.
Below the Image Selector/Image Control Panel there are three more sub-panels.
The Image Quality Warning Panel is not always shown. It is only shown on sources where we feel that better images, at higher resolution, may offer better clarity of the details of the research targets.

The Image Overview Panel shows the BSIP Reference for the specific image, its size (width x height) in pixels, whether of not this is the main image for the source, and the quality of the image.
Where the licence allows, a download icon is shown. Clicking this icon will download the current image.
Clicking the double-quote icon will open up a dialog box that enables citation for the specific image to be generated, and this can be copied to the clipboard. [Experimental feature: This is not available to all users and is being finalised. It will be made available to everyone shortly].
The permalink for this specific image is shown. Clicking the copy icon will copy this directly to the clipboard!
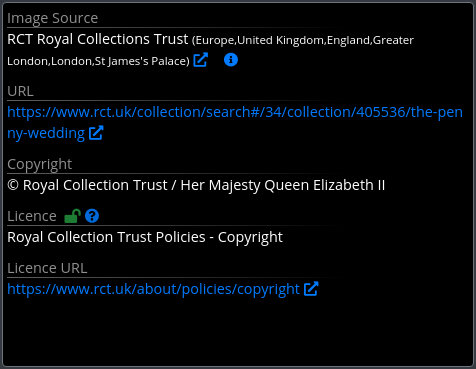
The Image Details Panel provides details about where the currently selected image was obtained from, what licence it was obtained under, who the copyright owner is.
Clicking on links (or the external link icons for the Image source) will open the link in a new tab. Clicking on an information icon (such as that shown in the Image Source) will take us to the location information page. This shows the details we have for that location in the BSIP database.
Should you wish to use an image, please use the information in this panel to obtain an image for the purposes you require, taking into account the nature of the licence required for your use. BSIP is not able to give permissions for any use except those where the images are marked as having been taken by BSIP founder Barry Pearce.
The Image Viewer Panel
At the heart of the SIV is the actual image viewer.
This is an advanced deep-zooming image viewer that supports keyboard, mouse, and touch screen controls. It is capable of efficiently displaying super-sized images. Using the + key, or double-left clicking we can zoom in and shift + double left click or the - key to zoom out. It supports pinch-zoom and rotate on touch screens. Holding down the left mouse button allows dragging (touch and drag on touch screens) or we can use the cursor keys to move the image around.
In the top left of the viewer are the basic viewer controls. These are shown when the mouse moves over the viewer or the screen is touched.
From left to right the controls are:
- Zoom in
- Zoom out
- Fit to panel (fit the image to the available space)
- Full screen
- Rotate left 10°
- Rotate right 10°
- Previous image
- Next image
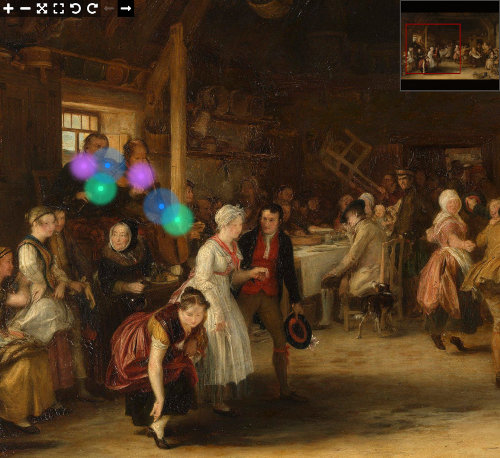
The full screen view enables viewing of the image completely unobstructed by the IRP. However, as the controls for pins & pulses are on the IRP menu bar (see below), one needs to turn these off/on as required before going to full screen as the IRP menu will not be visible.
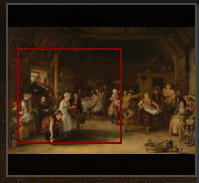
In the top right of the image viewer is the navigator. The red box shows the portion of the image that is currently being viewed. Clicking in the navigator will centre the viewable area on that location. We can also drag the box around inside the navigator (left mouse click + hold or by using touch) to move the viewable area around. This feature is useful at significant zoom levels.
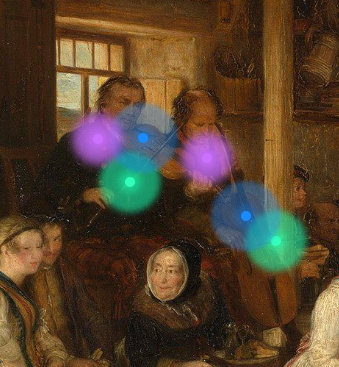
The BSIP database identifies individual research targets (Bows (B), Bow Accessories (BA), Bow Parts (BP), Instruments (I), Instrument Accessories (IA), Instrument Parts (IP) and Musicians (M). Pins & Pulses are overlaid on top of images to aid visual location and identification. Each research target type is colour-coded: blue for instruments, their parts and accessories, green for bows, their parts and accessories, and purple/magenta for musicians (this colour-coding is used on the Research Targets tab on the Source Info Panel). Hovering over, or touching a pin will cause a tooltip to appear identifying the research target.
We can toggle them off & on using the control buttons on the IRP menu bar above the image viewer. The left group of buttons controls both Pins & Pulses, and the right group just the pulses. The first button in each group is the main controller and overrides the individual research target type buttons. The other buttons control the individual types of research targets. The B button controls Bows, Bow Accessories and Bow Part research targets. The I button controls Instrument, instrument Accessories, and Instrument Parts. The M button controls the Musician research targets.
The Source Information Panel
The Source Information Panel may be collapsed/expanded using the double chevron icon on the top left of the panel or the expand/collapse buttons on the top left of the panel if on mobile. The top of this panel also includes the BSIP Reference for the source.
![]()
The refresh button refreshes the data from the database and resets the entire SIV. This button is mostly used by Curators to refresh records that are being worked on. Clicking double-quote button will open up a dialog box that enables citation/reference of the specific image to be generated, and this can be copied to the clipboard. The help button brings up this user guide!
Sources contain a lot of information so the Source Information Panel is split into 3 tabs.
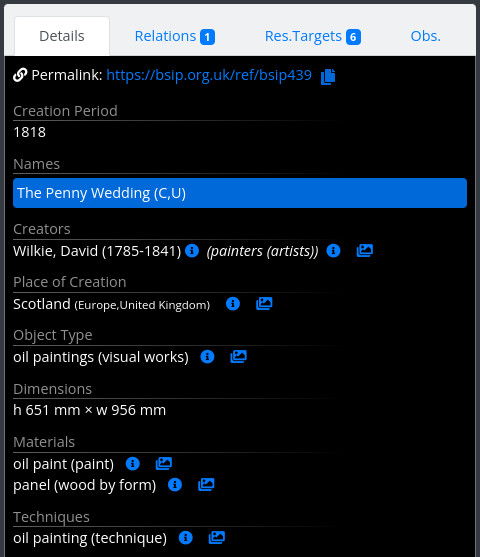

The Details Tab starts with the all important permalink. We can use this link to share this specific source. Clicking the copy icon will copy this directly to the clipboard! We should always share the URL to this source using the permalink and not the URL in the address bar. The URL in the browser address bar is subject to change and may not work in the future. Permalinks are guaranteed to always resolve correctly.
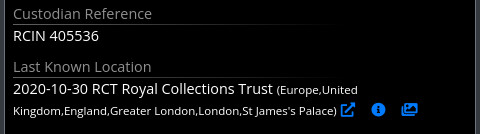
After the permlaink comes all of the main metadata, such as the work title (the preferred title has a blue background), who created the work, where/when it was created, basic information about the type of work, its size and the materials used. It also shows the last known location (if any) and a URL (if available) to an authoritative (or best available) source of information (often this is the museum/collection, a database such as RKD or an auction house).
Clicking on links (or the external link icons of collective sources or locations) will open the link in a new tab. Clicking on an information icon will take us to the information page for that metadata. For locations this also includes the longitude/latitude (GPS) coordinates and a map of the location and external links to Ggoogle Maps.
Clicking on the images icon appearing after a Creator, Collective Source, Creation/Find Location, or Last Known Location will take you to the Browse, and will automatically show other sources which are made by the same creator, are part of the same collective source, were created at or were last known at the same location. This makes it easier to find connected works.
New! Images icons are also available on tag sets to find other sources with tags from the same tag set, and on specific tags to find sources with that particular tag.
Hovering over the tag set (central reference on a tag) will reveal the description for that tag set. Similarly if a specific tag has a description (it may not for simple reference numbers) we can hover over the tag to reveal the description.
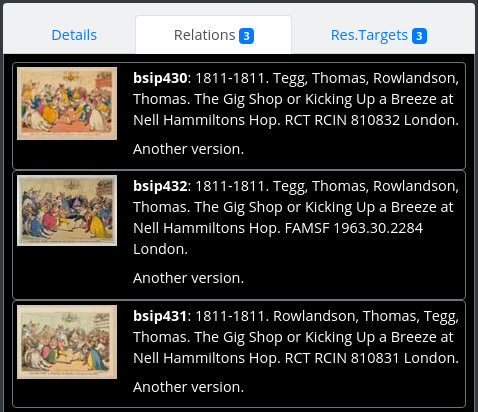
The Relations Tab shows other sources in the BSIP database which are related to this source and includes a description of its relationship. They may be copies of, derived works after this or indeed if this source is after another, it may show the original source. If a work is copied from another, and that work is also a copy both works share a common, root ancestor. In this case both the root original and the copy will be listed. The sources shown in here may be clicked on to navigate to the specific related source.
Relations may be cross-database. So iconographic sources may have a relation in the archaeology database and vice versa. If you select a cross-database source your current database will change.
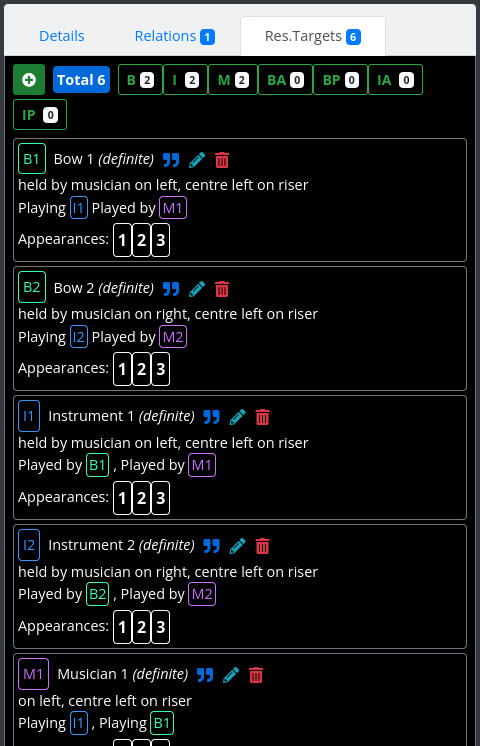
The Res. Targets Tab shows the individual research targets in a list. To the right of the overall target total are individual research target total boxes. The number shows how many research targets of that type are identified. The colour of the border indicates if those targets are shown in the panel. A green border showing that the targets of this type are listed in the panel, and red means they are hidden. This is useful to isolate particular research target types when there are a lot of targets identified on a source. Clicking these total boxes toggles the inclusion of the targets in the list below. Each target is listed with its BSIP Reference which is used to specifically refer to the research target. This is followed by its name/number and a measure of how sure we are that this is a target.
Each Research Target has a unique reference and can be individually referenced. Clicking double-quote icon will open up a dialog box that enables citation/reference of the specific target to be generated, and this can be copied to the clipboard.
Underneath this is a locating description to help aid visual location, and this is followed by the relationships the research target has with other research targets. Finally there is a list of images in which this target appears. We can click on the image numbers to select the specific image for display in the Images and Image Viewer panels.